|
It's very important to have an understanding of Ease and Standard Measurement Charts, so that you can accurately determine how much you need to adjust your own patterns. I also published a Youtube video about this topic.
Understanding Ease Charts So, here is an example of an ease chart. You can google ease chart, and there are a bunch of these all over the internet. The numbers are pretty much the same on all of them. If there are differences, they won't be very large differences. Now keep in mind, this chart is only for fabrics that don't stretch. If you are working with stretch fabrics, you can do pretty much anything you want. For the first line, we have close fitting. And they have measurements for the dresses and blouses column, and for the pants column. They don't have measurements for the jackets and coats columns, because it would just be pretty rare to have a close fitting jacket or coat. They would just be REALLY tight. The discrepancy I have with this chart is that you will never have zero ease. If you made a dress or blouse with zero ease, you wouldn't be able to breath. There is a minimum amount of ease necessary at the bust line to allow for breathing. The standard measurement for that is two inches. Some people may need more or less. Best to take your own bust measurement standing relaxed, then take it again after taking a deep breath. And that would be the minimum of ease you would need at the bust line. And this is called wearing ease. But do keep in mind that even after adding the wearing ease to your bust measurement, this would make a slightly loose garment when you are relaxed, but a tight fitting garment when you are taking a deep breath, which could cause pulling and gaping with a button down garment. So if you are working with a button down garment, you wouldn't want to use the ease guidelines for a close fitting garment. And it's the same for pants. If you made a pair of pants with no ease, you wouldn't be able to sit down. There is a difference in your hip measurement between standing and sitting. The standard measurement for hip ease is two inches. But again, you can take your hip measurement standing up, then again sitting down. Add an extra inch for good measure, and that difference would be your minimum wearing ease for your hip line. For me, I need just a bit more than 2 inches cuz I have a fat butt. So the rest of the lines, fitted, semi fitted and loose fitting, are pretty self explanatory. These are called design ease, and they are all about the look you are trying to achieve with your garment. Maybe a good way to think about it is like this. The first line, close fitting would be for a shirt. The second line, fitted would be for a vest. The next line, semi fitted would be for a frock coat. And the last line, loose fitting would be for an overcoat. So, for example, if you wanted a blouse to fit very loose like an overcoat, then you would add 5-8 inches of ease to your pattern, as it notes on the fourth line for a blouse. Now this is TOTAL ease. You don't add in the wearing ease, and then add in the design ease. These measurements are for the total ease to add. Just remember that you do need a minimum amount, so you would never design a garment with zero ease. Another way to figure out how much ease you want in your new pattern, is to grab a garment that you own, and that fits the way you want your new garment to fit, and take measurements from that garment.  For a blouse or dress, lay your garment flat on a table and measure the front from side to side right around the bust line, or slightly under the armscye, and then multiply by two for the full measurement of front and back pieces.  And for pants or skirts, you can do the same thing by measuring a garment you have around the hip area, and then multiply by two to get the full measurement for front and back pieces. Remember your hip line is approximately 9 inches below your waist line. OK. So hopefully this makes sense. Please let me know if it doesn't. Standard Measurement Charts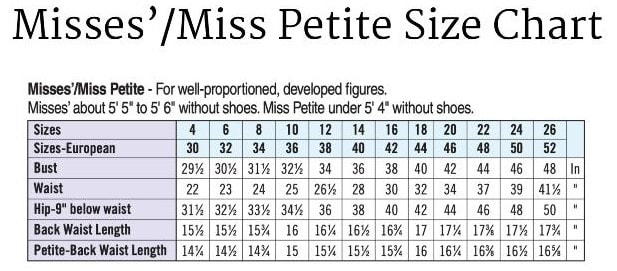 Next we are going to talk about standard measurement charts. Now you can find these charts on any of the big pattern company websites. Just google something like... simplicity standard measurement chart. So I can see on this chart that I am a perfect size 22. Which is crazy because I wear a size 14 in clothes that I buy at the store. So first thing is to note there is a difference between pattern sizing and clothing sizing. I have heard of so many people who have bought and/or cut a certain pattern size just based on their clothing size, and not even looking at the measurements on the chart. So just make sure you are aware of that. Now, I'm sure you can find your measurements on this chart too. Maybe it's easy, like mine. Or maybe its a bit more difficult because you are in between sizes. Maybe your bust is in one size, and your waist is in another size. My advice would be to choose the size that corresponds with your bust measurement for tops and dresses, and your hip measurement for pants and skirts. It is ALOT easier to make adjustments to the waistline. Now, if your measurements are not on this chart at all, either you are bigger or smaller. Don't worry, there is a solution for you too! 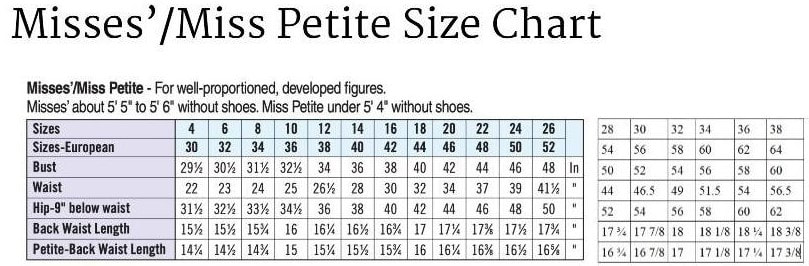 You can extend this chart up or down, whichever way you need to go. So you can see on this chart that the bust measurement increases two inches for each size. So for the next size up, you would add another two inches. And so on, up as many sizes as you need. And for the hip measurement, you can see the same two inch increase for each size. So you can add two inches for each size up as far as you need for the hip measurement as well. 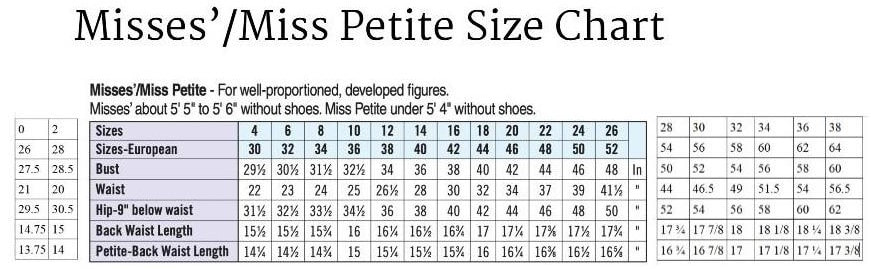 If you need to go down in sizes, notice the bust measurement decreases by one inch for each size. And the hip measurement is the same way. So you can continue the chart for smaller sizes too. The other important measurement on this chart is the back to waist length measurement. As you can see, the difference in these measurements from one size to the next is negligible - 1/4 inch per size in the middle and lower sizes, or 1/8 inch per size in the larger sizes. But when you go up or down say 4 sizes, you've got a very big jump. And you can see the difference between the regular height measurements and the petite height measurements. It's about an inch difference. And you could even add another line, or even two more lines onto the bottom of this chart for taller people. 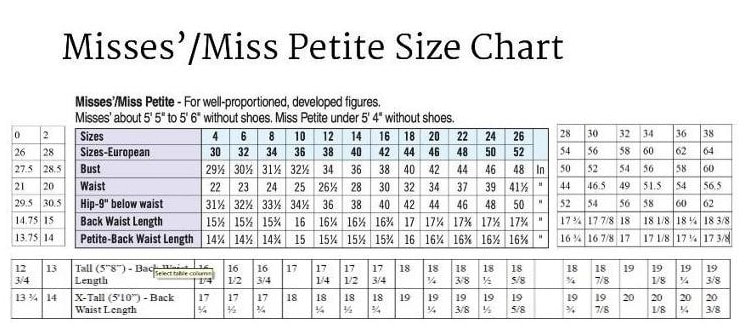 So for people who are 5 foot 8, you would add another inch to the regular measure. And for people who are 5 foot 10, you would add 2 inches. So this is another measurement to consider when resizing patterns, and this would be your vertical adjustment, from top to bottom. Pattern Size Charts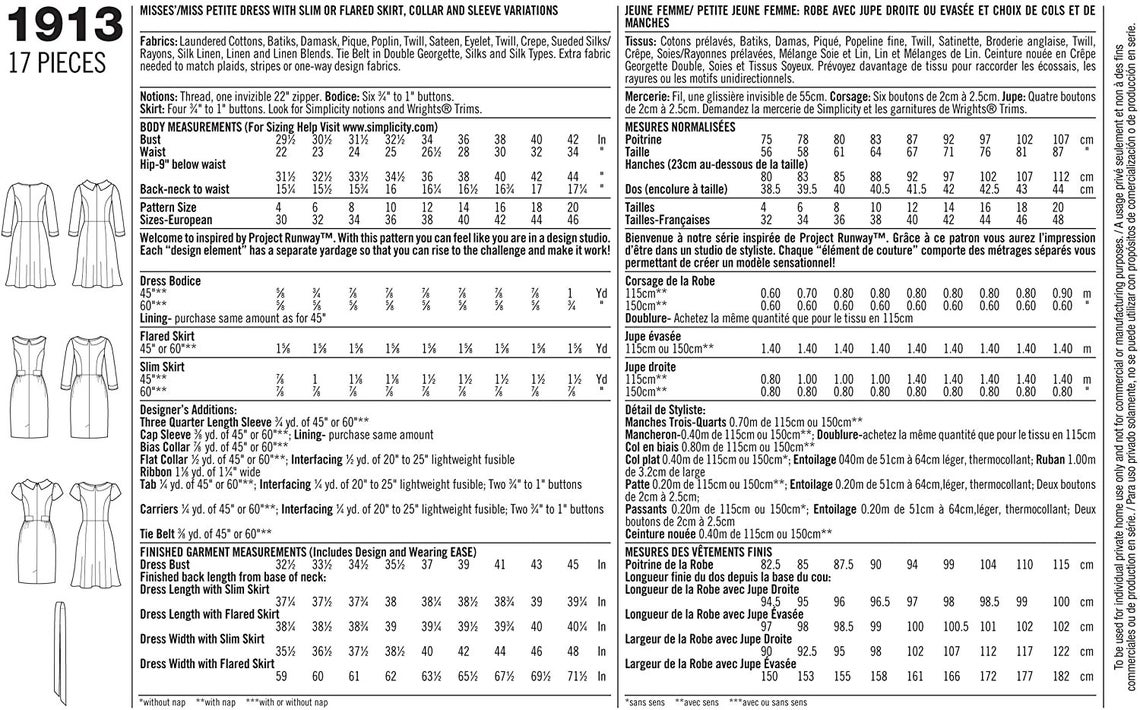 SO let's take a look at the size chart on the pattern you want to resize. Maybe it looks something like this.  You can see towards the top, the size chart and the measurements for bust, waist and hip. You can extend this chart to larger or smaller sizes, as much as you need, like I explained earlier. 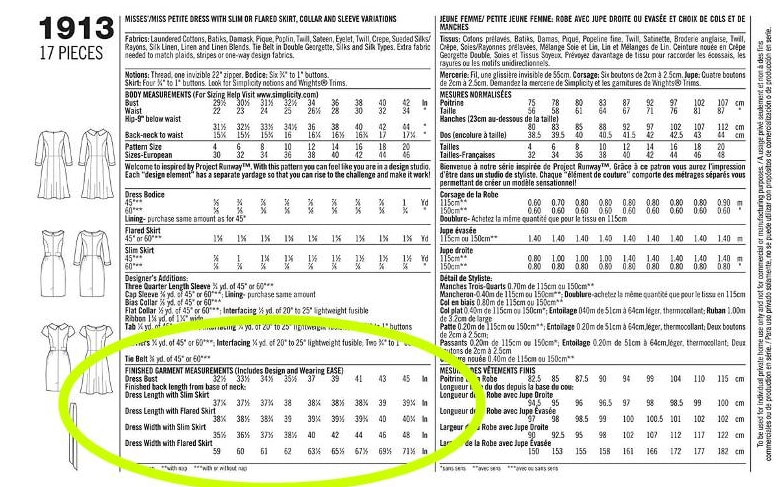 Now take a look towards the bottom, where it says finished garment measurements. For example, we will look at the largest size. The largest size is a bust 42, you see that at the top, then under finished measurements towards the bottom, it says bust 45. So this pattern is allowing 3 inches of ease for the bust line. Now earlier in this video, I explained the minimum wearing ease for the bust line should be 2 inches. So you can see from the finished measurements that this garment is meant to be a little tighter. If you don't want it to be that tight, then you might consider adding more to the bust measurement, or going up to the next higher size. 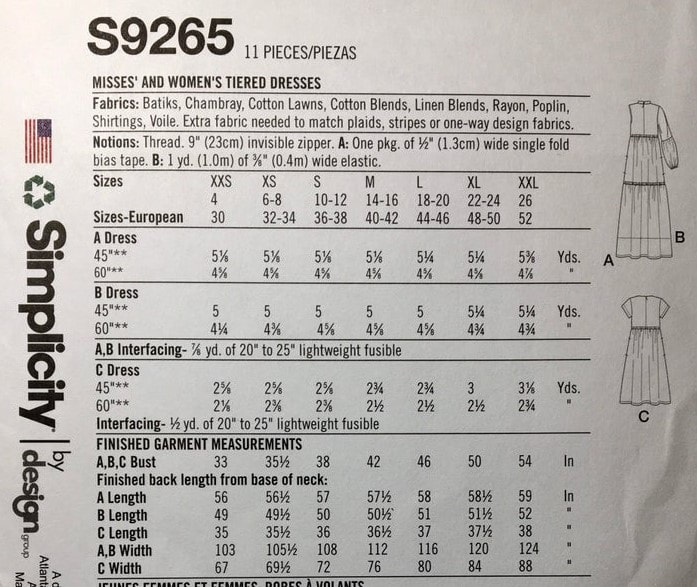 OK, here is another example. Maybe your pattern looks something like this. 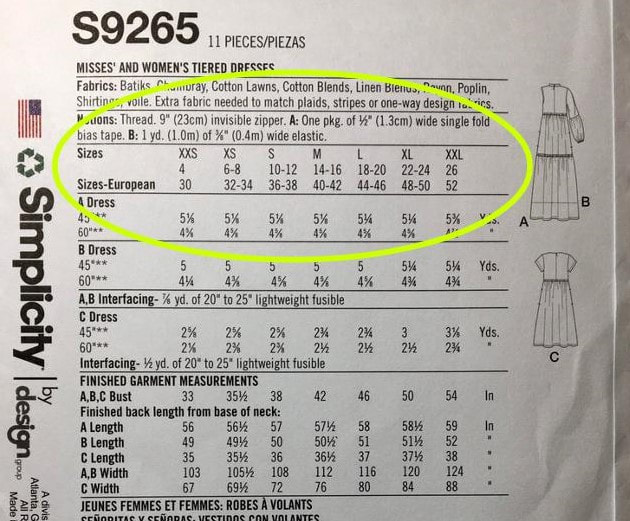 Now this pattern has the sizes marked, but it does not include the measurements. So for example, we will take a look at the largest size available in this pattern, which is a 26. So now we know we can go back to the Simplicity website and take a look at their standard measurement chart, and we see that a size 26 has a bust measurement of 48 inches. 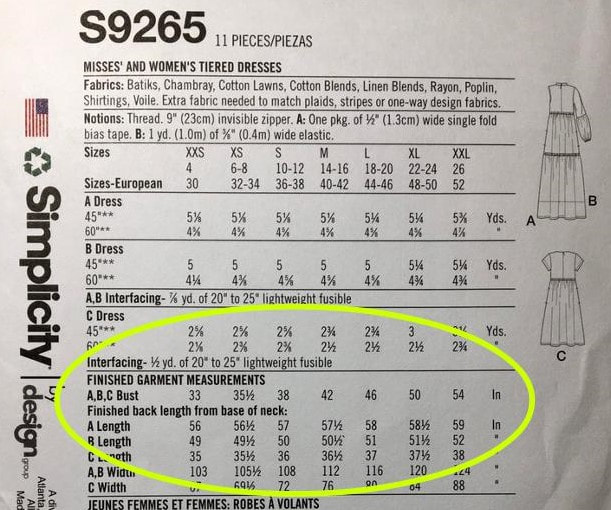 Then we go back to the pattern and look at the finished garment measurements, and we see that this size 26 has a finished measurement of 54 inches. So this garment has 6 inches of ease at the bust line, and that makes it a comfy loose type of garment. If you want more or less ease than what is offered, you can make adjustments as you want, or choose a smaller or larger size of the pattern. So, now let's put everything together. Let's say for example that you bought a pattern used at an awesome discount, but it is already cut out in a size 16, which is a bust size 38. Your bust measurement is actually 42, which is the size 20. So you already know you need to add 4 inches to the bust line, which means 4 inches of adjustment side to side, or horizontally, on your pattern. We can also see that the difference in the back neck to waist measure between the two sizes, from size 16 to size 20, is ½ inch. So we also need to adjust our pattern by ½ inch from top to bottom, or the vertical adjustment.
Then we look at the ease allowed for in the pattern. The ease for this pattern is three inches at the bust line. So if you want more or less ease, then you can adjust your measurements accordingly. So now you know how to figure out how much pattern adjustment you need for resizing your patterns. I hope this makes sense. Again, if it doesn't, please let me know. I really hope this has been helpful to you. And thanks so much for joining me today. Take care and happy sewing!
0 Comments
Leave a Reply. |
Follow us on your favorite Social Media!
Archives
September 2021
Categories |
 RSS Feed